The Loop Stitch is a variation of the Buttonhole Stitch. The most important rule of this stitch is to "maintain an even tension". This is not a
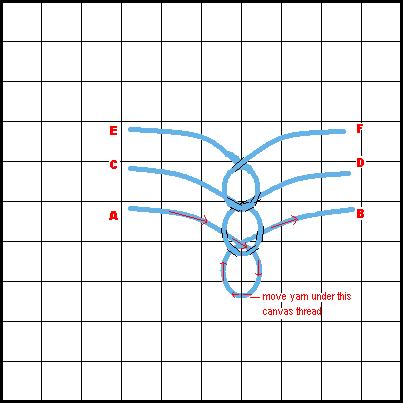
Loop Stitch (Diagram 1):
Bring the needle up at A, follow the red arrows in the above diagram, take the yarn under the canvas thread where noted and create the first loop. Hold the loop in place while you bring the needle down at B. Continue holding the first loop and bring the needle up at C. Create the second loop by working the yarn OVER the yarn of the first loop but UNDER the canvas thread. This second loop will anchor the first loop. Hold the second loop in place while you bring the needle down at D. Continue holding the second loop and bring the needle up at E. Create the third loop by working the yarn OVER the yarn of the second loop but UNDER the canvas thread. This third loop will anchor the second loop. Hold the third loop in place while you bring the needle down at F.
tied stitch and must, therefore, be held in place while you work the next stitch. One diagram has been used to demonstrate this stitch. Clicking on the PRINTABLE VERSION icon, located at the end of the diagram, will direct you to the page to print these instructions.
If the loops appear to be crooked when you are finished with the row, simply adjust them with your fingernail until they appear even.
Do you have a sample of this stitch that you would like to share? If so, click here...
traditional rug making technique is still used today in some of the Asian countries. Traditional rug making changed a few hundred years ago by adding a hand held hook tool to make the process quicker and easier.
Today, the latch-hook is the most commonly used tool used when creating rugs. The punch needle runs a close second in the rug making popularity race. We will explore the
nomadic tribes of Europe and Asia. Wool harvested from herds of sheep was used to create the first rugs. The oldest rug, found frozen and perfectly preserved in ice, is believed to have been hand-made around the fifth century BCE. The earliest rugs were created by hand, with no needles, latch hooks or tools. They were made using a technique called "knotted pile" rug making. Basically, this style of rug making involves a length of wool being tied – or "knotted" – by hand over and over again. This
Hooking The Night Away…
By: Carolyn McNeil
When I use the term "hooking" I am referring to the craft of latch-hook rug making. Why, what did you think I was going to write about? Well, let's not go there.
First, let me begin with a quick history of rug making. Rug making is a very old form of needle art. It is widely believed that rug making began thousands of years ago with the
latch-hook method in a moment. First, let us take a look at some of the needlepoint stitches that may be used to create rugs. These stitches fall into the category known as "looped stitches", aka "pile stitches". All of these stitches create a texture with a three-dimensional look. The pile surface is created by the loops contained in the stitches. Some stitches remain with the loops intact; some require the loops be cut. Other than the basic Loop Stitch, some of the more common rug stitches are the Chain Stitch, the Astrakhan Velvet Stitch and the Surrey Stitch. It should be mentioned, however, that all of these stitches require some knowledge of
needlepoint and should not be attempted by a beginner. For the rug making beginner, I would recommend the latch-hook type rug.
Latch-hook rug making, as I stated earlier, is probably the most popular type of rug making today. Not coincidently, it also happens to be the easiest type of rug making today. Basically, a hook (with a latch, hence the name) is used to work the precut lengths of yarn into the rug canvas. The rug canvas is generally 3.3 mesh, however, smaller meshed canvas may be also be used. I have seen two methods of latch-hooking rugs. The first method, the one that I use, is the easiest. Loop the piece of yarn around the end of the
hook – the actual "hook" part of the latch-hook – push the hook and yarn down through one square and up under the canvas thread, bringing the hook up into the square above until the latch part of the latch-hook has cleared the canvas thread. Wrap the yarn around the front of the latch hook, while pulling the latch closed as you move the latch-hook back down through the canvas. This will pull the yarn through and create the knot. You may tighten the knot by hand if necessary. The second method requires you to hook the yarn from behind the latch and come around to the front, using more yarn. This method is too complicated and does not
make the rug more durable.
The greatest challenge to latch-hook rug making is finding quality rug kits to work. Shillcraft has been a leading source of latch-hook rugs for many years. They recently re-vamped their website and appear to have added some interesting rugs to their catalog. Currently, I have been working rugs that have been designed by an EBay seller. These are some very exciting designs. The finished rugs look as beautiful as the sample picture promises. I recently completed a rug with a dog design – a pug.
I call him "Pugsly, the pug rug" (see image). If you are looking for new and interesting designs, I strongly recommend these rugs. The EBay ad (above) is currently showing samples of these rugs. Click on the ad for more details and pricing. Oh, do not be deterred by the fact that these rugs are selling through EBay. All of these rugs are offered through the seller's EBay store, so bidding is not necessary. I should note, however, shipping will take about four weeks for these rugs. Trust me; it will be worth the wait…
Enough of the blatant product promotion! Regardless of what type of rug making you choose, it can be a relaxing and rewarding experience. Take a seat on that comfortable couch, turn the tunes on, adjust the lighting and start hooking the night away…
***Stitch Index*** (Alphabetical)
A - I
***Stitch Index*** (Alphabetical)
I - Z
Copyright 2006...Stitchopedia...All Rights Reserved
An encyclopedia of needlepoint Stitches...