
NOBUKO STITCH
The Nobuko Stitch consists of alternating rows of diagonal stitches and tent stitches. This stitch creates a woven look, suitable for houses or
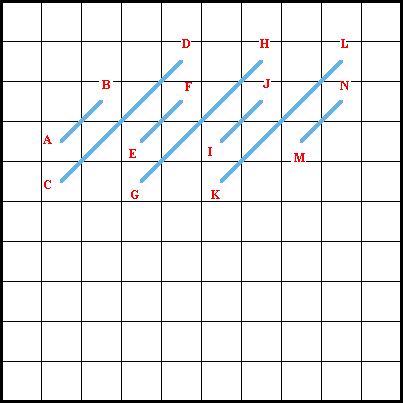
Nobuko Stitch (Diagram 1):
Bring the needle up at A, move up and to the right over one canvas intersection, bring the needle down at B. Bring the needle up at C, move up and to the right over three canvas intersections, bring the needle down at D. Bring the needle up at E, move up and to the right over one canvas intersection, bring the needle down at F. Bring the needle up at G, move up and to the right over three canvas intersections, bring the needle down at H. Bring the needle up at I, move up and to the right over one canvas intersection, bring the needle down at J. Bring the needle up at K, move up and to the right over three canvas intersections, bring the needle down at L. Bring the needle up at M, move up and to the right over one canvas intersection, bring the needle down at N. Now, continue on to Diagram 2...
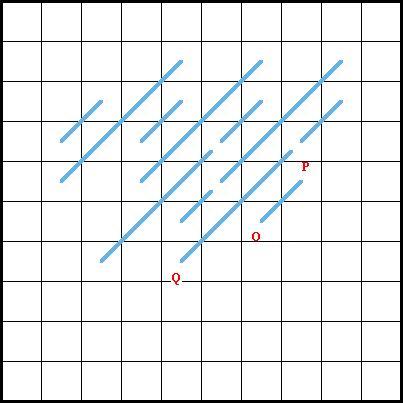
Nobuko Stitch (Diagram 2):
The second row is worked in the opposite direction of the first. Each stitch will be worked into the bottom of the previous row - as shown in Diagram 2. Bring the needle up at O, move up and to the right over one canvas intersection, bring the needle down at P. Bring the needle up at Q, move up and to the right over three canvas intersections, bring the needle down at M. Continue working in this manner until the end of the row.
wooden structures. The Nobuko Stitch is also a wonderful stitch when working skies. Using an overdyed* thread/yarn will create a natural looking sky. (To add stars, use a metalic thread for the tent stitches.) This stitch also makes an interesting background stitch. *(Note: an overdyed thread is a thread or yarn that is not one solid color. Instead, it consists of colors that graduate into each other. For example: Black, to a lighter black, to a dark gray, to a medium gray, to a light gray and so on...) Two diagrams have been used to demonstrate this stitch.
 | ||||||
Stitch-opedia
An encyclopedia of needlepoint Stitches...

ALTERNATING NOBUKO STITCH


Alternating Nobuko Stitch (Diagram 1):
The first row of the alternating nobuko stitch is worked in the same manner as the regular nobuko stitch. Bring the needle up at A, move up and to the right over one canvas intersection, bring the needle down at B. Bring the needle up at C, move up and to the right over three canvas intersections, bring the needle down at D. Bring the needle up at E, move up and to the right over one canvas intersection, bring the needle down at F. Bring the needle up at G, move up and to the right over three canvas intersections, bring the needle down at H. Bring the needle up at I, move up and to the right over one canvas intersection, bring the needle down at J. Bring the needle up at K, move up and to the right over three canvas intersections, bring the needle down at L. Bring the needle up at M, move up and to the right over one canvas intersection, bring the needle down at N. Now, continue on to Diagram 2...
Alternating Nobuko Stitch (Diagram 2):
The second row of this stitch is where it differs from the original nobuko stitch. This row has been illustrated in dark blue. Beginning where we left of at N, we will now work this row in the opposite direction. Bring the needle up at O, move up and to the left over one canvas intersection, bring the needle down at P. Bring the needle up at Q, move up and to the left over three canvas intersections, bring the needle down at R. Bring the needle up at S, move up and to the left over one canvas intersection, bring the needle down at T. Bring the needle up at U, move up and to the left over three canvas intersections, bring the needle down at V. Bring the needle up at W, move up and to the left over one canvas intersection, bring the needle down at X. Bring the needle up at Y, move up and to the left over three canvas intersections, bring the needle down at Z. Bring the needle up at AA, move up and to the left over one canvas intersection, bring the needle down at BB. Bring the needle up at CC, move up and to the left over three canvas intersections, bring the needle down at DD. Bring the needle up at EE, move up and to the left over one canvas intersection, bring the needle down at FF. Now, continue on to Diagram 3...
Alternating Nobuko Stitch (Diagram 3):
This diagram illustrates how four rows of the alternating nobuko stitch should look when complete.
Copyright 2006...Stitchopedia...All Rights Reserved
*Stitch Index*
Select the first letter of the stitch you are looking for...
*Stitch Index*
Select the first letter of the stitch you are looking for...
| ||||||