


SHELL STITCH
The Shell Stitch is also referred to as the looped and tied sheaf stitch. This stitch may be used as a filling stitch or as a decorative border. The Shell
Shell Stitch (Diagram 1):
Bring the needle up at A. Move up 6 canvas threads and bring the needle down at B. Move to the left over 1 canvas thread and down 6 canvas threads and bring the needle up at C. Move up 6 canvas threads and bring the needle down at D. Continue in this manner until the needle is brought down through H. Now, move on to diagram 2...
Shell Stitch (Diagram 2):
Beginning where we left off at H, move down 2 canvas threads and over to the right 1 canvas thread and bring the needle up at I. Work the yarn under the G/H straight stitch and pull the working yarn over all four of the straight stitches we made in diagram 1.Move over to the right 1 canvas thread and bring the needle down at J. This completes the first stitch. Continue in this manner for the entire row. When the row is completed, move on to diagram 3...
DIAGONAL SHELL STITCH
Stitch is worked in two separate journeys. Basically, it consists of four straight stitches (upright gobelin) tied together with a straight horizontal stitch. The second journey consists of a loop that is worked into the horizontal tie down stitches. Three diagrams have been used to demonstrate this stitch. Following the shell stitch demonstration, we have also demonstrated the diagonal shell stitch.
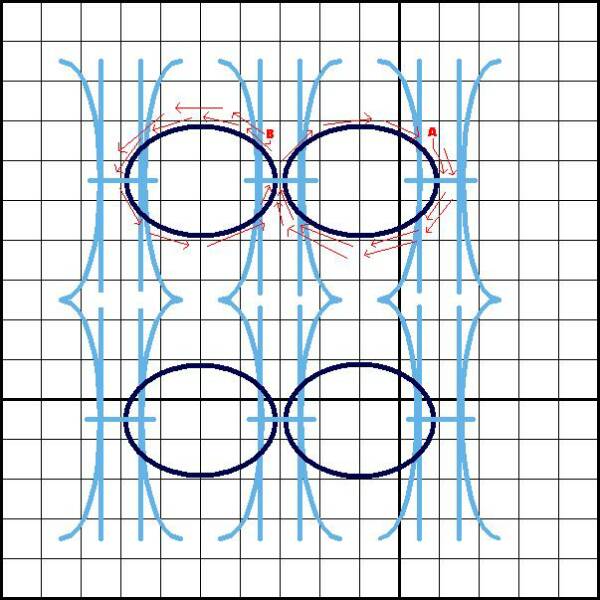
Shell Stitch (Diagram 3):
Once the row of stitches is complete, it is time to add the loop stitch that will join each of the tied sheaf stitches together. For a nice decorative look, you may choose to work the loops in a different color. Before we start, you may want to enlarge the above diagram by clicking on "Larger Image". The larger image will open in a separate window for your convenience. Bring the needle up at A (Be sure to tie the loose end off on the back side of the canvas before you start the loops). Moving down, work the yarn under the first horizontal tie down stitch and up under the second horizontal tie down stitch. Continue the loop by bringing the yarn back down through the first horizontal tie down stitch at A. Now bring the yarn up through the second horizontal tie down stitch at B. This is demonstrated by the red arrows in diagram 3. Now, move on to the next loop... Beginning where we left off at B, continue working the yarn up and over to the third horizontal tie down stitch. Bring the yarn under this stitch and move to the right, bringing the yarn up and under the second horizontal tie down stitch at B. Move up and over to the left and work the yarn under the third horizontal tie down stitch. This is the beginning of the next loop, which will be worked in the same way as the first loop. Continue in this manner until the row is complete.
 | ||||||
Stitch-opedia
An encyclopedia of needlepoint Stitches...

Diagonal Shell Stitch (Diagram 1):
Bring the needle up at A, move up and to the right over four canvas intersections, bring the needle down at B. Bring the needle up at C, move up and to the right over four canvas intersections, bring the needle down at D. Bring the needle up at E, move up and to the right over four canvas intersections, bring the needle down at F. This completes the diagonal stitch section. Now, continue on to Diagram 2...

Diagonal Shell Stitch (Diagram 2):
Beginning where we left off at F, we will now add the tie-down stitch. Bring the needle up at G, move up and over the three diagonal stitches, bring the needle down at H. Now, continue on to Diagram 3...
Diagonal Shell Stitch (Diagram 3):
It is now time to add the loop stitches. The loop stitches are illustrated in dark blue. They are worked in the same manner as the regular shell stitch.
Copyright 2006...Stitchopedia...All Rights Reserved
*Stitch Index*
Select the first letter of the stitch you are looking for...
*Stitch Index*
Select the first letter of the stitch you are looking for...
| ||||||