The Basketweave Stitch is one of the three common tent stitches (petit point). A tent stitch is a stitch that is
Basketweave Stitch (Diagram 1):
Bring the needle up at A, move up and to the right over one canvas intersection, bring the needle down at B. Bring the needle up at C, move up and to the right over one canvas intersection, bring the needle down at D. Bring the needle up at E, move up and to the right over one canvas intersection, bring the needle down at F. Bring the needle up at G, move up and to the right over one canvas intersection, bring the needle down at H. Bring the needle up at I, move up and to the right over one canvas intersection, bring the needle down at J. This completes the first row of Basketweave Stitches. Now, continue on to Diagram 2...
Basketweave Stitch (Diagram 2):
Beginning where we left off at J, bring the needle up at K, move up and to the right over one canvas intersection, bring the needle down at L. Bring the needle up at M, move up and to the right over one canvas intersection, bring the needle down at N. Bring the needle up at O, move up and to the right over one canvas intersection, bring the needle down at P. Bring the needle up at Q, move up and to the right over one canvas intersection, bring the needle down at R. Bring the needle up at S, move up and to the right over one canvas intersection, bring the needle down at T. This completes the second row of Basketweave Stitches. The third row should be worked from top to bottom - as in Diagram 1.
formed diagonally over one canvas intersection. The other two tent stitches are the Continental Stitch and the Half-Cross Stitch. The name, basketweave stitch, is derived from the woven (basketweave) pattern that forms on the back of the piece. The woven back is what makes this the most durable of the three tent stitches. There is also a reversed basketweave stitch that creates the "basketweave" look on the front and leaves the tent stitches on the back. Two diagrams have been used to demonstrate this stitch.
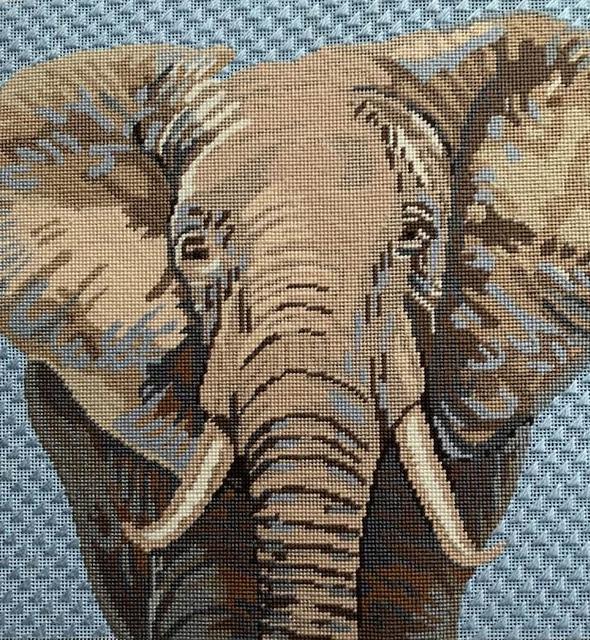
With literally hundreds of stitches to choose from, the tent stitch is the stitch most commonly chosen to work needlepoint projects. It is a simple stitch, worked diagonally over one canvas intersection. There are three separate variations of the tent stitch; the continental stitch, the half cross stitch and the basketweave stitch. All three of these tent stitch variations create a flat surface on the canvas. So, how do you differentiate between the three types of tent stitches? The difference exists in the way that each stitch is worked. The reverse side of each stitch will create a substantially different look as well. In spite of these differences, however, the question remains, which tent stitch is the correct one to use for your project? Allow me to answer this question by delving into the basics of each stitch.
First, let us discuss the continental stitch. Although the continental stitch is commonly referred to as the tent stitch, it is actually just a type of tent stitch. The continental stitch is worked horizontally from right to left. It should be mentioned, however, that this stitch may also be worked vertically. The best use for this stitch would be for filling small areas of canvas, outlining areas or creating straight lines. The single lines may be worked horizontally or, in some cases, vertically. The continental stitch requires more yarn than the half cross stitch, which makes it more durable than the half cross stitch. The reason for the larger yarn requirements and the hardwearing durability of this stitch is in the way in which the continental stitch fully covers the back of the canvas. The reverse side of the continental stitch will give the appearance of long, slanted stitches. In spite of this, it is not as durable as the basketweave stitch. When working the continental stitch, like the half cross stitch, the canvas will need to be turned at the end of each row. Turning the canvas upside down to work each consecutive row is necessary to maintain the even, flat look of the stitch. The main drawback of this stitch is its tendency to pull and distort the canvas. This distortion is the result of working the stitch in the same direction. The constant pulling of the canvas in one direction will stretch and distort that canvas. This is the reason the continental stitch should not be used to fill large areas of canvas.
Next, let us discuss the half cross stitch. The half cross stitch is worked horizontally from left to right, the exact opposite of the continental stitch. It is highly recommended that this stitch be worked on Penelope canvas. This is the least durable of the three tent stitches because it does not use as much yarn. This is an important point to make about the half cross stitch, especially when working a needlepoint kit. When working a project from a kit, it is inadvisable to replace the half cross stitch with one of the other tent stitches because you will probably run out of yarn. Like the continental stitch, the half cross stitch should not be used to fill large areas of canvas. Again, the reason for this is because it tends to distort the canvas. Remember, as with the continental stitch, you are pulling the canvas in one direction when working the half cross stitch. This stitch is best when working small areas of canvas or a single line. The reverse side of the half cross stitch will consist of small, straight stitches. There will be portions of canvas showing through the back side of the half cross stitch. Remember, this stitch uses less yarn than the other two tent stitches, so it will not cover as much canvas, and be less durable. For this reason, the half cross stitch should not be used when working hardwearing projects such as pillows, upholstery covers or clothing. Like the continental stitch, the half cross stitch requires that you turn the canvas at the end of each row. As you can probably deduce from this description, the half cross stitch is not a popular tent stitch.
Finally, let us discuss the most popular tent stitch, the basketweave stitch. The basketweave stitch is worked diagonally, up and down the canvas. Basically, a small diagonal stitch is worked over one canvas intersection, followed by another row of two stitches, followed by another row of three stitches and so on. The name, basketweave stitch, is derived from the woven – or basketweave – pattern that forms on the back of the piece. By working the tent stitches in a diagonal manner up and down the front of the piece, straight horizontal and straight vertical stitches are how the "woven" look is created on the back. Because of this, the basketweave stitch is the most durable of the three tent stitches. It is important to work this stitch moving one row up the canvas with the next row moving down the canvas. If the direction of rows is not alternated when working this stitch, the finished piece will not appear consistent. This stitch also uses more yarn than the other two tent stitches. Despite the large amount of yarn it uses, the basketweave stitch is an excellent choice for filling large areas without causing canvas distortion. The reason for this exists in the way in which the stitch is worked. By working the stitch diagonally and creating a woven back, the canvas is pulled in more than one direction. This gives the canvas an even tension and will prevent the dreaded distortion from occurring. If you find that you like the look of the back of the basketweave stitch, you may want to try the reversed basketweave stitch. This stitch is exactly what the name implies. It is a series of straight stitches that create a basketweave – or woven – look.
So, which stitch should you choose for your project? The answer will depend on you project. If you are working from a kit, work the tent stitch that is listed in the instructions. Remember, each of the three tent stitches have different yarn requirements. Replacing one tent stitch with another could be detrimental to the outcome of your finished piece. For
projects that do not come with yarn, your choice will depend on the answers to these three questions: What kind of canvas is being used? For mono canvas, try not to use the half cross stitch. Choose from the other two tent stitches. How large is the area being stitched? For a large area, the basketweave stitch is recommended. What amount of daily wear will the finished piece receive? For hardwearing projects, the continental stitch or the basketweave stitch are recommended. Whichever variation of the tent stitch you choose, do not alternate rows of continental, half cross or basketweave stitches. This will create an uneven (and unpleasant) look. Choose one type of tent stitch and work it. You will be amazed at how relaxing these repetitive stitches can be. Happy stitchin'…
Which Stitch Is Which?
By: Carolyn McNeil
2/1/2008
An encyclopedia of needlepoint Stitches...
Copyright 2006...Stitchopedia...All Rights Reserved
*Stitch Index*
Select the first letter of the stitch you are looking for...
*Stitch Index*
Select the first letter of the stitch you are looking for...