BUTTONHOLE STITCH
The Buttonhole Stitch may be worked on fabric as well as canvas. This stitch may be resized to suit project needs.
DOUBLE BUTTONHOLE STITCH
WHIPPED BUTTONHOLE STITCH
The Double Buttonhole Stitch is similar to the buttonhole stitch except for the space left between the stitches. This stitch is an excellent choice for working borders.
The Whipped Buttonhole Stitch is similar to the buttonhole stitch except for the whipping stitches that are added, hence the name. For a more interesting effect, work the whipping stitches in a different color. Note: Diagram 1 and Diagram 2 are exactly the same as the first two diagrams of the buttonhole stitch.
TAILORED BUTTONHOLE STITCH
The Tailored Buttonhole Stitch is similar to the buttonhole stitch except for the loop that is added during the stitch. This stitch makes an excellent border. Because of the knot that is formed, it creates a tight, secure stitch.
It is worked horizontally from left to right. There are a number of variations of this stitch. On this page we are demonstrating the regular buttonhole stitch, the double buttonhole stitch, the tailored buttonhole stitch and the whipped buttonhole stitch. The other variations of the buttonhole stitch are the detached buttonhole stitch and the buttonhole wheel stitch. Multiple diagrams have been used to demonstrate this stitch.
Buttonhole Stitch (Diagram 1):
Bring the needle up at A, move up over three canvas threads and to the right over one canvas thread, bring the needle down at B. It is necessary for you to hold your thumb over the bottom of the yarn until the next stitch is completed. Now, continue on to diagram 2...
Buttonhole Stitch (Diagram 2):
Beginning where we left off at B (remember, you should still be holding the first stitch in place with your thumb), bring the needle up at C, move the needle/yarn OVER the previous (A/B) stitch, move up over three canvas threads and to the right over one canvas thread, bring the needle down at D. Again, hold the yarn for this stitch in place with your thumb until the next stitch is complete. Bring the needle up at E, move the needle/yarn OVER the previous (C/D) stitch, move up over three canvas threads and to the right over one canvas thread, bring the needle down at F. Hold the yarn for this stitch in place with your thumb until the next stitch is complete. Bring the needle up at G, move the needle/yarn OVER the previous (E/F) stitch, move up over three canvas threads and to the right over one canvas thread, bring the needle down at H. You will need to work a small tent stitch to hold the last buttonhole stitch in place. This completes the buttonhole stitch.
Double Buttonhole Stitch (Diagram 1):
Bring the needle up at A, move up over three canvas threads and to the right over two canvas threads, bring the needle down at B. It is necessary for you to hold your thumb over the bottom of the yarn until the next stitch is completed. Bring the needle up at C, move the needle/yarn OVER the previous (A/B) stitch, move up over three canvas threads and to the right over two canvas threads, bring the needle down at D. Hold the yarn for this stitch in place with your thumb until the next stitch is complete. Bring the needle up at E, move the needle/yarn OVER the previous (C/D) stitch, move up over three canvas threads and to the right over two canvas threads, bring the needle down at F. Work a small tent stitch to hold this buttonhole stitch in place. Now, continue on to Diagram 2...
Double Buttonhole Stitch (Diagram 2):
Beginning where we left off at F, turn the canvas upside down to continue. Bring the needle up at G, move up over three canvas threads and to the right over two canvas threads, bring the needle down at H. Again, it is necessary for you to hold your thumb over the bottom of the yarn until the next stitch is completed. Bring the needle up at I, move the needle/yarn OVER the previous (G/H) stitch, move up over three canvas threads and to the right over two canvas threads, bring the needle down at J. Hold the yarn for this stitch in place with your thumb until the next stitch is complete. Bring the needle up at K, move the needle/yarn OVER the previous (I/J) stitch, move up over three canvas threads and to the right over two canvas threads, bring the needle down at L. Work a small tent stitch to hold this buttonhole stitch in place. This completes the double buttonhole stitch.
Whipped Buttonhole Stitch (Diagram 1):
Bring the needle up at A, move up over three canvas threads and to the right over one canvas thread, bring the needle down at B. It is necessary for you to hold your thumb over the bottom of the yarn until the next stitch is completed. Now, continue on to diagram 2...
Whipped Buttonhole Stitch (Diagram 2):
Beginning where we left off at B (remember, you should still be holding the first stitch in place with your thumb), bring the needle up at C, move the needle/yarn OVER the previous (A/B) stitch, move up over three canvas threads and to the right over one canvas thread, bring the needle down at D. Again, hold the yarn for this stitch in place with your thumb until the next stitch is complete. Bring the needle up at E, move the needle/yarn OVER the previous (C/D) stitch, move up over three canvas threads and to the right over one canvas thread, bring the needle down at F. Hold the yarn for this stitch in place with your thumb until the next stitch is complete. Bring the needle up at G, move the needle/yarn OVER the previous (E/F) stitch, move up over three canvas threads and to the right over one canvas thread, bring the needle down at H. You will need to work a small tent stitch to hold the last buttonhole stitch in place. Now, continue on to Diagram 3...
Whipped Buttonhole Stitch (Diagram 3):
Once the original buttonhole stitches are complete, the whipping stitches are added. The whipping stitches are illustrated in light blue. It is important to note that these stitches are worked under the buttonhole stitches, not the canvas.
 | ||||||
 | ||||||
Stitch-opedia
An encyclopedia of needlepoint Stitches...
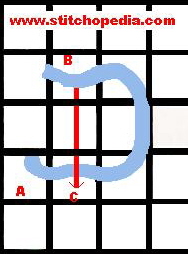
Tailored Buttonhole Stitch (Diagram 1):
Bring the needle up at A, creating a loop, bring the needle down at B. Moving under two canvas threads, bring the needle up at C. Be sure to bring the needle OVER the looped thread. Now, continue on to Diagram 2...
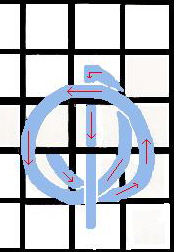
Tailored Buttonhole Stitch (Diagram 2):
Beginning where we left off at C, follow the red arrows to complete the knot, forming the stitch.
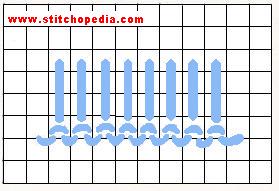
Tailored Buttonhole Stitch (Diagram 3):
This diagram illustrates how a row of tailored buttonhole stitches should look when complete.
Copyright 2006...Stitchopedia...All Rights Reserved
*Stitch Index*
Select the first letter of the stitch you are looking for...
*Stitch Index*
Select the first letter of the stitch you are looking for...
 | ||||||


