

Hoop Frame
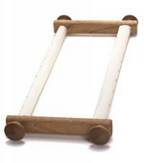
Scroll Frame
THE BASICS
-FRAMES-
Using a frame for your needlepoint project is highly
recommended. Not only will the frame free your hands to work the stitches, it will also help maintain an even stitch tension. Frames help to prevent the canvas from being distorted during the stitching process. Some stitches, like cross stitches, can force the canvas to change shape. Using a frame will reduce this problem. The type of frame required will depend on the size of the needlepoint piece.
Hoop (aka Tambour) Frame: This frame consists of two hoops (hence the name). One hoop is placed on top of the other hoop and secured by a screw on the side. Basically, you would lay your piece of cloth over the first hoop, place the second hoop on top and proceed to tighten the screw. Hoop Frames are best for small detailed work.
Scroll Frame: This frame consists of two dowels that fit into two straight sides. The sides are generally secured by screws on each of the four corners. These screws are used to tighten the sides to the dowels. Scroll Frames are especially useful for large pieces. The canvas would be attached (flat-head thumbtacks are best) to each dowel, with the bottom dowel being turned - or scrolled - until the canvas is tight. The sides of the canvas would then need to be attached to the two straight wooden sides. Again, flat-head thumbtacks work best. This pulls the canvas in four directions. Once you have finished working the area that is visible, simply remove the side thumbtacks, unscrew the tightener screws, roll (scroll) the canvas up until you reach the next portion of your piece, tighten the tightener screws and attach the canvas to the sides, again, with flat-head thumbtacks.
Stretcher Bar Frame: This frame consists of four straight wooden pieces that are assembled to create a square or rectangle. The canvas is attached to all four straight wooden pieces (flat-head thumbtacks are best, but you may use staples). This frame is available in many different sizes. Be sure to choose a size that is sufficient for your piece. The inside measurements of the frame should be slightly larger than the area of the canvas that is to be worked. Stretcher Bar Frames may also be used to frame the finished piece (see Finishing).
These are the basic frames available. There are, however, attachments you may purchase to make stitching your projects easier. For example, you may want to add a floor stand to your frame to free your hands from holding it. See the advertisement section below for ideas.
TYPES OF FRAMES:
While many needlepoint books and resources insist that the use of a frame is not necessary for most projects, I am unable to imagine working any needlepoint project without one.
There are two important reasons to use a frame for needlepoint. The first and most important reason for using a frame is to prevent the canvas from becoming distorted by the stitches. The second reason supports the first reason. Working with a frame will free your hands, allowing you to maintain an even rhythm as you work the needle up and down through the canvas. This will enable you to keep your stitch tension even. An even stitch tension is the major factor in preventing canvas distortion. Proper stitch tension will allow the yarn to be kept taut around the canvas threads. Stitch tension that is too loose will cause snagging. Stitch tension that is too tight will, again, distort the canvas. If the canvas becomes severely distorted, finishing the project with a wall frame may become impossible.
There are two basic types of needlepoint frames – the round (hoop) frame and the straight frame. The hoop frame is sometimes referred to as the tambour frame. This round frame consists of two rings (hoops). The canvas or material would be placed on top of the smaller hoop and the larger hoop would then be placed over the smaller hoop (with the canvas) and tightened by an outside screw. The fabric must be kept taut when the larger hoop is screwed in. Hoop frames are suited to fine detailed work (like embroidery) and should be used when working with softer canvases, such as aida cloth or linen. Hoop frames are available in many sizes, from four inches to twelve inches in diameter. They are also available with many attachments that help make working your project a little easier. The most common hoop frame is the Hand-Held Hoop. This is an extremely portable hoop frame and is available in wood, plastic or metal. The Standing Hoop is the basic hand-held hoop attached to a floor stand. These are generally made of wood and can be adjusted for height and hoop angle. The Fanny Hoop is the basic hand-held hoop attached to a flat stand. This hoop stand may be worked on a table. The most common use for the Fanny Hoop is to sit on the flat part of the stand and work your project. This is where the name comes from. It should be noted that the angle of the hoop may not be adjustable with the Fanny Hoop. There are also hoops available with clamps that attach to the side of a table. These are height and angle adjustable.
The straight frame has also been referred to as the slate frame. The most commonly used straight frame is the Scroll Frame. This frame consists of two dowels that fit into two straight sides. The sides are generally secured by screws on each of the four corners. These screws are used to tighten the sides to the dowels. Scroll Frames are especially useful for large pieces. The canvas would be attached (flat-head thumbtacks are best) to each dowel, with the bottom dowel being turned - or scrolled - until the canvas is tight. The sides of the canvas would then need to be attached to the two straight wooden sides. Again, flat-head thumbtacks work best. This pulls the canvas in four directions. Once you have finished working the area that is visible, simply remove the side thumbtacks, unscrew the tightener screws, roll (scroll) the canvas up until you reach the next portion of your piece, tighten the tightener screws and attach the canvas to the sides, again, with flat-head thumbtacks. Another common straight frame is the Stretcher Bar Frame. The Stretcher Bar Frame consists of four straight wooden pieces that are assembled to create a square or rectangle. The canvas is attached to all four straight wooden pieces (flat-head thumbtacks are best, but you may use staples). This frame is available in many different sizes. Be sure to choose a size that is sufficient for your piece. The inside measurements of the frame should be slightly larger than the area of the canvas that is to be worked. Stretcher Bar Frames may also be used to frame the finished piece. As with hoop frames, straight frames have a few attachments available to make your project easier to work. Straight frames may be mounted on floor stands, keeping your hands completely free. The height and angle of the frame are adjustable with floor stands. Some straight frames come equipped with a sit-on stand. Again, the height and angle of the frame are adjustable.
The final decision about working with a frame is, of course, up to you.
To Frame Or Not To Frame, That Is The Question
By: Carolyn McNeil
8/1/2007
 | ||||||
Stitch-opedia
An encyclopedia of needlepoint Stitches...
Copyright 2006...Stitchopedia...All Rights Reserved
*Stitch Index*
Select the first letter of the stitch you are looking for...
*Stitch Index*
Select the first letter of the stitch you are looking for...
| ||||||